I don’t know exactly when it happened, but somewhere along the way I learned that much of the secret to being considered a good cook is building a repertoire of reliable, adaptable recipes. It’s not so much a matter of startling creativity—although a good imagination does help—as it is a matter of having a good foundation of knowledge from which to work.
Almost every good cook I know will tell you that there are some recipes to which they return again and again. Many are classics. The mother sauces, a good pie crust, a basic bread recipe, and a few reliable roasts are common reference points for most cooks.
Pâte à choux is one of those foundation recipes that cooks look to again and again. Most commonly known to North Americans as the stuff cream puff shells are made of, it is a simple recipe and relatively quick to make. The finished pastries provide a crisp crust that can be filled with all sorts of foods, both savoury and sweet. Add some cheese to the dough and you have gougères; a lovely treat that requires no filling at all. Pâte à choux freezes very well; yet another reason I keep going back to it as a baking mainstay.
I’ll be making some up hors d’oeuvre trays next week and, with that in mind, I made small pâte à choux shells today. I stored them away in the freezer, one less thing to worry about on the day I’m actually delivering my treats.
To make pâte à choux, you’ll need:
- 1/2 cup (1 stick) butter
- 1 cup water
- 1/4 teaspoon salt
- 1 cup all purpose flour
- 4 eggs
Cut the butter into tablespoon sized pieces and combine it with the water and salt in a heavy bottomed saucepan. (If you have a non-stick pan you can use for this, it’ll save you some clean up time later.) Place the pan on medium heat and cook until the butter is melted and the mixture is boiling.
Remove the pan from the heat and add the flour all at once. Stir vigourously to blend.
Return the pan to the heat and cook the batter, stirring constantly for 4 to 5 minutes. The mixture will form a thick mass that clings together. If you’re not using a non-stick pan, the dough will leave a light film on the bottom of the pot. When it’s cooked enough, you’ll see almost no wisps of steam rising—an indication the any excess water in the dough has evaporated. The dough will look like this:
Remove the pan from the heat and let the dough cool for 5 minutes.
Break one of the eggs into the pan and beat vigourously until the egg is completely absorbed into the batter and the dough is smooth. Add the remaining eggs, one by one, beating until smooth after each addition. You’ll end up with a thick, very sticky dough that looks like this:
To make round shells like mine, scoop spoonfuls of the dough out of the pot and place them about 2 inches apart on cookie sheets that have been lined with parchment paper. I used about a tablespoon of dough for each of my shells.
Once the dough has been placed on the cookie sheets, wet your fingertips in some cold water and use them to smooth the rounds. Mound them so they’re higher in the center and make sure there are no little peaks standing up from the dough. They’ll burn if you leave them.
Once the dough has been smoothed, bake your shells in the center of the oven at 375ºF for about 30 minutes, until the dough has risen and has turned golden brown.
Remove the shells from the oven and turn off the heat. (Now you can see where the name comes from. They do sort of resemble cabbages.)
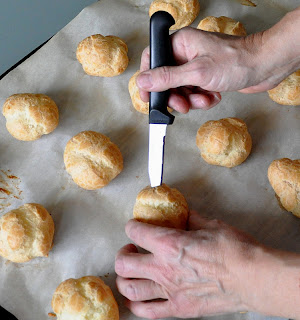
Leave the shells on the baking sheet and pierce each one twice with the point of a sharp knife.
Return the shells to the oven and let them dry out for 10 minutes more.
If you’re not freezing your pâte à choux shells, they should be stored in an airtight container and used as soon as possible. If you are freezing them, thaw them when you wish to use them and then re-crisp the shells in a 325ºF oven for 10 minutes.
When you're ready to use your pâte à choux shells, cut a "lid" from the top of each shell. This inside of the shells should look like this:
Gently remove any moist dough from the center of each shell, leaving a fairly substantial wall on the outside. Once that's done, they're ready for whatever filling you choose to put in them.
Put the filling into the shells then gently replace the "lids" so they sit on top of the filling.
I use small shells like these ones for hors d’oeuvres and for sweets, but I make larger ones if I’m planning to use them as a vessel for serving hot fillings with sauces, or for curries or stews. If I’m making éclairs, I put the dough into a piping bag with a large round tip and pipe it into strips about 4 inches long.
Baking times will vary depending upon the shape and size you choose to make the pastries. Your eyes and nose are a better gauge than any timer could be. You can smell the pastry as it cooks. Look for that golden brown colour. Once you’ve made them once, you’ll have no problem knowing when they’re done.


No comments:
Post a Comment